Posted in Cooking, FALL!, Foodie, Holidays, Thanksgiving

Foodie Friday – Thanksgiving Leftovers

I hope you all had a wonderful Thanskgiving! If you’ve got Thanksgiving leftovers you’re not sure what to do with…..I’ve rounded up some yummy sounding recipes you might like to try. Here they are….

Happy Cooking!

Lori


Posted in FALL!, Holidays, Ramblings, Thanksgiving, Thoughts

Thoughts on Thursday – So Thankful!

On this Thanksgiving, I feel particularly thankful for so many things. I thought I would share them with you….

  • I’m thankful for my hubby (known as Mr. Muddling or sometimes, the co-muddler…). He’s my best friend and my rock. He can make, build and fix anything (I’m constantly amazed at this….). There is no way the property we live on could have been developed on our budget without him. Period.
  • I’m thankful for where we live. A beautiful area in the great state of Oregon, in the good old U.S.A. Sure, every place, anywhere in the world, has it’s problems, but I’m convinced the good still outweighs the bad.
  • I’m thankful for our church, our pastors and prayer. All a major part of my spiritual journey.
  • I’m thankful for family, friends and neighbors. Even though we don’t always get together as often as we’d like (why is life so crazy busy?), we can always depend on each other to help out, cheer us up or even celebrate the joys in life.
  • I’m thankful for the blogging community. The sharing of this community has enriched many areas of my life. I’ve learned many crafty things, new recipes, new skills and different perspectives on many things.
  • I’m thankful for all the readers of this blog. Even though we’ve never met, I consider you friends. I have valued your advice and encouragement. I hope I’ve shared something of value to you (even if it’s just my quirky attempt at humor…. 😉 ).

This list is FAR from complete. There are just SO MANY things to be thankful for! I hope you all have a wonderful Thanksgiving! Don’t forget to take a moment and reflect on all the things you’re thankful for.

Happy Thanksgiving!

Lori

Posted in Apples, Canning & Freezing, Cranberries, FALL!, Foodie, Holidays, Instant Pot

Foodie Friday – For the Love of Cranberries

Thanksgiving is on it’s way and if you LOVE cranberries (if you hate them, look away now….), I’ve found a couple of recipes for your Instant Pot! (And. because it’s how I roll, I’ll also tell you the modifications I made to them along the way…..).

The first recipe is this Instant Pot Cranberry Sauce. So good! Here’s the modifications I made….

  • I made a half batch (since I’m the only one in our household who eats cranberries….), so I cut all the ingredients in half.
  • I squeezed the juice from one orange (in place of the apple juice), including the pulp.
  • I also used the zest from that orange (about 2 Tbsp. of zest).
  • I used sugar-free (stevia) sweetener in place of the sugar (and sugar-free maple syrup).

Here’s another peek at the cranberries in their steamy loveliness…YUM!

Here’s MORE cranberry yumminess! Combined with Apples….I didn’t even peel the apples, just washed, cored and chopped them. To make this Instant Pot Cranberry Applesauce . Oh! My! It is GOOD! The only changes I made to this recipe was to eliminate the brown sugar and use sugar-free maple syrup.

After you whirr it up with the Immersion Blender, it has a beautiful rosy color to the applesauce. I canned up a few jars for later this winter (just using the processing time for the water bath canner of a standard applesauce recipe…).

Aren’t they pretty?

Happy Cooking!

Lori

Posted in Cooking, FALL!, Instant Pot, Recipes, Soups

Souper Sunday – Clam Chowder

In my opinion, Fall (and Sunday) is the perfect time for a hot bowl of Clam Chowder! I found an amazing, fast recipe using my new Instant Pot (I should also mention here, this is just the product I bought, there are other types and brands of multi-cookers on the market….I REALLY wanted this Quick Cooker, but my recent party was not as good as I’d hoped and while I could justify this cooker at 60% off, I just couldn’t justify it at full price….but that’s just me….).

This Saute button is the secret to this yummy Clam Chowder.

It allows you to render the fat out of your bacon and saute your onions and celery right in the same pot. I did make one little change to the recipe. It had you drain your clams and to the reserved liquid, add enough water to make 2 cups of liquid. I added an 8 oz. bottle of clam juice that I had on hand, instead of the water. I really like clammy tasting Clam Chowder! 😉

Including prep time, I probably only spent 30 minutes getting this Clam Chowder to the “Keep Warm” stage. I kept the chowder on the “keep warm” for a couple of hours until we were ready to eat (and to thicken, because Mr. Muddling likes thick soups….you know the kind you could eat with a fork thick…  😉 )

Anyway, if you like Clam Chowder, this is a recipe I highly recommend! Oh! In case you missed it earlier, here’s the recipe I used. Enjoy!

Happy Cooking!

Lori


Posted in Apples, Canning & Freezing, Cooking, FALL!, Instant Pot, Recipes

Foodie Friday – Instant Pot

First of all, I should let you know, I bought an Instant Pot last week. The funny thing about this is, Mr. Muddling and I had discussed whether or not we thought we needed and Instant Pot in our kitchen. Mr. Muddling was pretty convinced we did NOT need one. I was not so sure. Now, to be fair to Mr. Muddling, I DO have a “little bit” of a problem when it comes to kitchen gadgets. I want them ALL! AND. I have a VERY small kitchen space. After awhile, the gadgets wind up in the pantry area of our storage shed. Then, when we don’t have room for pantry items, decisions are made and kitchen gadgets go to the thrift store to live in someone else’s kitchens (or storage sheds?).

I kept doing research (on Pinterest….where else would you do research?) and found LOTS of ideas for using the Instant Pot. including this list of 11 Surprising things you can make in an Instant Pot and this Simple Guide on How to Use an Instant Pot. I was convinced this would be an appliance we would use A LOT (but then….aren’t I always?). Well….while Mr. Muddling was hunting, and I was left unsupervised (and in charge of the check book), I purchased a 6qt. Instant Pot! I’m pretty much in LOVE with it! The first thing I made (right after the water test they insist you do to test out the machine) was Hard Boiled Eggs . HUGE success! Mr. Muddling and I were CONVINCED we couldn’t cook an easy-peel egg. We have tried EVERY trick in the book! I’m happy to report these were not only the easiest eggs I’ve ever cooked, but they peeled like a dream!

I also found this YUMMY recipe for Instant Pot Apple Butter! I usually make my apple butter in the Slow-Cooker (which the Instant Pot has a slow-cooker feature too!), but this was SO MUCH faster! I had processed 2 completed batches of apple butter in less than 4 hours (In the slow-cooker, 1 batch would take over 24 hours just to cook down!)! YES!

I’m convinced this was a great purchase for our kitchen! I’ve pretty much used it at least once a day since I got it home! If you’re time-crunched like me, and haven’t purchased one yet….you might think about it…..seriously.

Happy cooking!

Lori

Posted in Apples, Dehydrating, FALL!, Recipes, Tutorials

Tutorial Tuesday – Dehydrating Apples

Last week, I picked about 30 lbs. of apples from a friend’s tree. I decided I wanted to dehydrate some of them, because….

  1. They store really well
  2. They’re easy to process. And.
  3. They’re just SO GOOD!

In case you want to take advantage of apple season and dehydrate your own batch of apples, here’s what I did….

Dehydrated Apples:

What you’ll need:

  • Apples (any variety you desire)
  • Fruit Fresh mixed in cold water (this keeps your apples from turning brown)
  • A Dehydrator
  • A knife (or Apple peeler/corer/slicer)
  • cinnamon, pumpkin pie or apple pie spice, if desired.

Directions:

In a large bowl, mix 5 Tbsp. Fruit Fresh into 1 gallon cold water. Peel and core your apples. Slice into thin slices, about 1/4″ thick. I used an older Apple peeler/corer/slicer that would be similar to this one. I liked that my slices were consistent and it was MUCH faster than using a knife! Cut slices in half,  if desired. Immediately immerse apple slices into the Fruit Fresh mixture. Let apple slices soak for about 10 minutes

Using a slotted spoon, arrange apple slices onto your dehydrator trays. (You can also sprinkle cinnamon, pumpkin pie spice or apple pie spice over your apple slices, if desired)

Set your dehydrator to 135F-145F. Your apple slices will be dry in about 6-8 hours (depending on your dehydrator, so start checking around 4 hours….). Your apple slices will be done when they are dry and leathery with no pockets of moisture. Pack your dried apples into an air tight container and store in a cool, dry location…..that is, if you don’t eat them immediately! 😉

Enjoy!

Happy Dehydrating!

Lori

Posted in Crafting, FALL!, Melt & Pour, Pumpkin Spice, Soap, Tutorials

Tutorial Tuesday – Pumpkin Spice Latte Soap

Fall is the perfect time to start thinking about gift giving. Handmade soap is a perfect last-minute gift idea, because, other than waiting for the soap to dry, it takes like 5-minutes to melt, mix and pour into your molds! I had been seeing lots of Pumpkin Spice soap ideas, but decided to add coffee grounds since they make a nice exfoliant.

Just so you know, I’ve only ever made “Melt & Pour Soap”. I just don’t trust myself to venture into the whole “Lye Soap” thing. I’m not really a rule follower. I feel like that might be bad when dealing with lye. Not to say that I don’t read Lye Soap articles/recipes…..I just haven’t convinced myself that I won’t “blow up my house” or “have a serious injury” yet. Maybe someday. For now, I’ll stick with “Melt & Pour”….

Pumpkin Spice Latte Soap:

Materials:

(I got mine at Michaels crafts, but there are online sources as well)

  1. 1/2 lb. Melt-able soap base (goat’s milk or Shea butter)
  2. Soap colorant….a couple drops each of orange and gold (or any color or combination of colors to get you to a tan color)
  3. 1 tsp. pumpkin spice
  4. 1 tsp. dried, used coffee grounds
  5. Soap fragrance….a couple drops of Vanilla (or any other coffee fragrance desired)

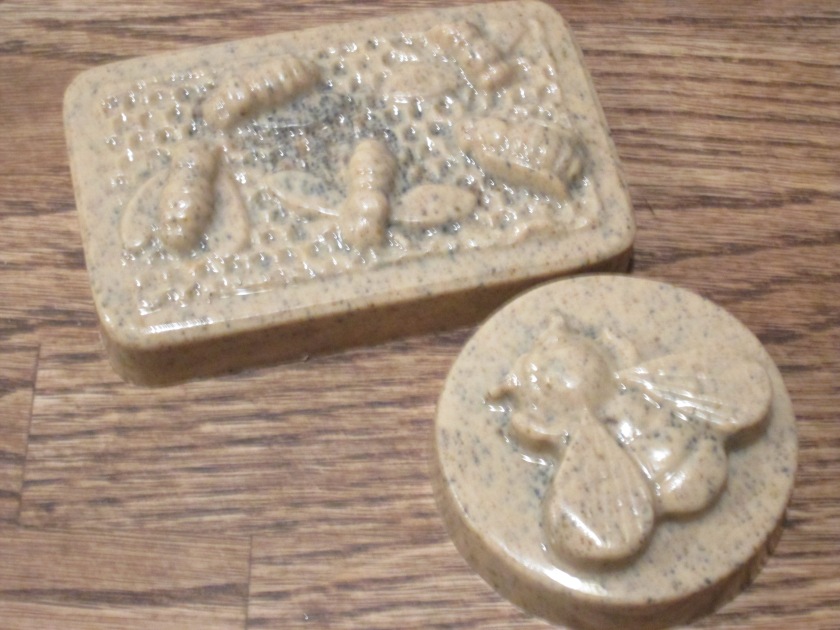
And. Soap molds….Aren’t these honeybee molds ADORABLE?!?! (….and, you’re not limited to just soap molds either, those silicone candy and baking molds work great too!)

Directions:

A few days before I was ready to make my soap, I dried some used coffee grounds on a parchment lined cookie sheet on the counter. It’s better to use dried, used coffee grounds. That way the oils aren’t too potent…..

Cut 1/2 lb.  of your soap base into cubes for easier melting. Put your soap base cubes into a microwaveable container and microwave for 1 minute until it’s smooth and pourable. If it’s not smooth, continue microwaving with 10 second intervals until it is. (If you prefer, you could also melt your soap base on the stovetop)

Working quickly (Your soap base will start hardening fairly quickly), add: Pumpkin Pie Spice, Dried coffee grounds, soap fragrance and colorant. Stir until smooth. Pour into your molds, tap lightly to settle soap, then let set a MINIMUM of 40 minutes. The longer the better though….I usually let mine set overnight.

Gently unmold your soap….

Grab a cup of coffee or tea and sit back and admire your handiwork for a moment or two! 😉 Then wrap your finished soap in some pretty fabric or paper (maybe even a pretty washcloth….) and tie with some raffia or twine all ready for gift giving!

Happy Soap Making!

Lori


Posted in Cowls/Neckwarmers, FALL!, FOs, Knitting, Scrappy, Stashbuster

Scrappy Sunday – Posie Rows Scarf

I’m SO excited to announce the project I’ve been working on through September! I’ve been test knitting this scrappy Posie Rows Scarf by designer Julie Tarsha of the Simply Notable Blog. I wanted to do a scrappy version (mostly because I have SO MUCH sock yarn odds and ends I wanted to use up!), so I gathered up my sock yarn/mini skein yarns and created a Scrappy Self-striping yarn ball . I used the Russian Join to join up all the pieces, but Simply Notable also has an interesting join called the Magic Knot (see this post) that I’m going to test out soon!

If a scrappy version doesn’t appeal to you, don’t worry, this scarf looks great in 2 solid colors (or a solid and a variegated/self-striping). I decided to make a minor change to my scarf. I only knit 30″ in length (although it blocked out to 44″ in length!) and seamed the cast-on and bind-off edges together to make a cowl.

I’m VERY happy how it turned out! I hope you decide to knit yourself a Posie Rows Scarf soon. It’s such an enjoyable knit!

Happy Knitting!

Lori

Posted in FALL!, Quilting, Quilts, Sewing, Stashbuster, WIPS

WIP Wednesday – Maple Leaf Quilt

Yesterday, I shared the Maple Leaf Quilt Block. This is the Maple Leaf quilt top I’ve been working on for quite awhile now. It’s one of those projects I started that got pushed aside for whatever reason. Probably something “New and Fresh” came along and I quickly abandoned this for the new project. If you’ve followed along with the blog, you know it happens! 😉

The funny (or maybe tragic would better describe it) thing is, I really only need to sew a few more blocks together (maybe 7?) and this quilt top would be DONE!

I feel like this quilt top should be finished BEFORE fall is over (I think technically that gives me until December 21st, right?!?)!!!! I’m determined now….I WILL complete this quilt top! Anyone believe me?

Happy Quilting!

Lori